Do Smart Doorbells Need Wiring? Wired vs Battery, Install Options (UK 2025)
Do smart doorbells require wiring? Clear UK-focused answer: wired vs battery, install paths, costs, voltage, Wi‑Fi, chime compatibility, and a simple checklist.
Thinking about adding a video doorbell but not sure how to wire it? You’re not alone. Many homeowners get stuck on whether to go hardwired or stick with a battery model. The right choice depends on your home’s wiring, budget, and how much hassle you want to deal with. Below we break down the options and give you a clear plan to get your doorbell online.
Hardwired doorbells use the existing doorbell transformer (usually 16‑24 V) to power the camera, chime and any extra features. The upside is you never have to swap batteries, and video quality stays consistent. The downside is you need to run a new low‑voltage cable or use a transformer kit, which can be a bit messy if you’re not comfortable with basic wiring.
Battery doorbells are plug‑and‑play. They sit on the wall, get a charge from the built‑in battery, and you can move them around if needed. They’re perfect for renters or for houses where pulling new wires is a nightmare. Just remember the battery will need a recharge every few months, and cold weather can shorten its life.
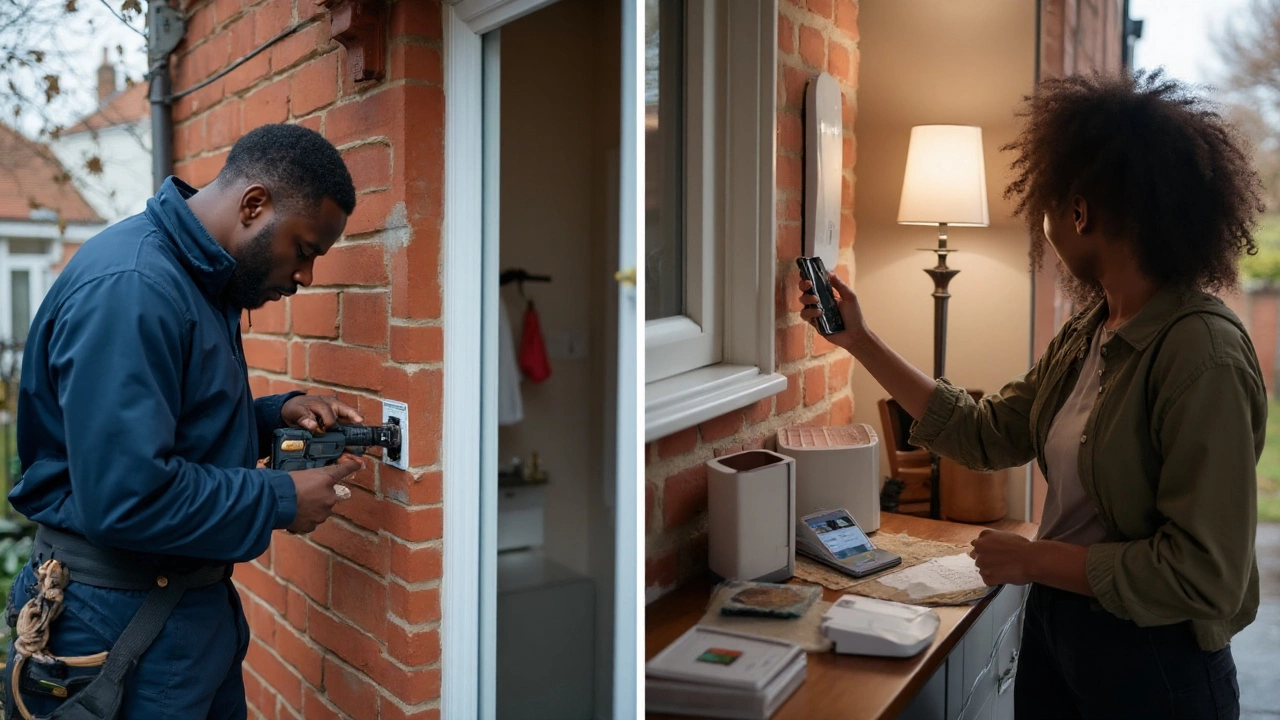
1. Turn off the power. Find your home’s fuse box and flip the breaker that controls the doorbell circuit. A quick test with a screwdriver on the existing doorbell will confirm it’s dead.
2. Remove the old doorbell. Unscrew the front plate, pull the unit off the wall, and note where the two wires connect. Take a photo if you’re worried about forgetting the wiring pattern.
3. Check the transformer. Use a multimeter on the two wires coming from the wall. You should see around 16‑24 V AC. If the voltage is low, replace the transformer with a 24 V one for better performance.
4. Mount the new doorbell base. Most video doorbells come with a mounting bracket. Attach it with the supplied screws, making sure it’s level and not too close to a window where sunlight could glare on the lens.
5. Connect the wires. Tighten the two low‑voltage wires onto the terminals on the back of the doorbell. Some models label them ‘front’ and ‘trans.’ If you have a separate chime, connect the ‘trans’ wire to the chime’s transformer terminal.
6. Secure the doorbell. Snap the front cover onto the base, tighten any remaining screws, and turn the breaker back on. Your doorbell should now power up and start connecting to Wi‑Fi.
7. Set up the app. Follow the manufacturer’s instructions to add the doorbell to your smartphone app, adjust motion zones, and test the live feed.
If you hit any snags, check the FAQ section of the doorbell’s website or give a local electrician a call. Most problems boil down to loose connections or a transformer that’s too weak.
For battery‑powered models, the process is even simpler. Just charge the unit, mount the bracket, snap the doorbell in place, and follow the app setup. No wires, no breaker, just a quick charge every few months.
When you’re done, you’ll have a doorbell that lets you see who’s at the door, talk to visitors, and get alerts on your phone. It’s a small upgrade that makes a big difference in home security – something Birmingham Security Command Center can help you fine‑tune with professional monitoring if you want extra peace of mind.
Do smart doorbells require wiring? Clear UK-focused answer: wired vs battery, install paths, costs, voltage, Wi‑Fi, chime compatibility, and a simple checklist.